The top 10 programming languages to learn in 2024
The tech industry is constantly evolving, and new programming languages are emerging all the time. However, some programming languages have stood the test of time and remain popular among developers. In this blog post, we will discuss the top 10 programming languages to learn in 2024.
1. Python

Python is a general-purpose programming language that is known for its simplicity and readability. It is used for a wide variety of tasks, including web development, data science, machine learning, and artificial intelligence.
Python is a great choice for beginners because it is relatively easy to learn. It also has a large and supportive community, which means there are many resources available to help you learn and troubleshoot problems.
2. JavaScript

JavaScript is a front-end programming language that is used to create interactive web pages and web applications. It is also used for back-end development with the Node.js framework.
JavaScript is a must-learn for anyone who wants to be a web developer. It is also a good language to learn for data science and machine learning, as it is used with popular libraries such as TensorFlow and PyTorch.
3. Java

Java is a general-purpose programming language that is known for its reliability and portability. It is used for a wide variety of tasks, including web development, mobile development, and enterprise software development.
Java is a good choice for beginners because it is a well-established language with a large community. It is also a good choice for students who want to learn a language that is used in industry.
4. C/C++

C and C++ are low-level programming languages that are known for their performance and efficiency. They are used for a wide variety of tasks, including operating system development, game development, and embedded systems development.
C and C++ are more difficult to learn than Python or JavaScript, but they are essential for anyone who wants to work on high-performance systems or embedded systems.
5. Go

Go is a general-purpose programming language that is known for its simplicity and concurrency features. It is used for a wide variety of tasks, including web development, cloud computing, and distributed systems development.
Go is a good choice for beginners because it is relatively easy to learn. It is also a good choice for developers who want to work on high-performance or distributed systems.
6. Swift

Swift is a general-purpose programming language that is developed by Apple. It is used for developing iOS, macOS, and watchOS applications.
Swift is a good choice for beginners because it is relatively easy to learn. It is also a good choice for developers who want to work on Apple platforms.
7. Kotlin

Kotlin is a general-purpose programming language that is developed by JetBrains. It is used for developing Android applications, web applications, and desktop applications.
Kotlin is a good choice for beginners because it is relatively easy to learn. It is also a good choice for developers who want to work on Android or multi-platform applications.
8. Rust

Rust is a general-purpose programming language that is known for its safety and performance. It is used for a wide variety of tasks, including web development, systems programming, and embedded systems development.
Rust is a good choice for developers who want to work on high-performance or safety-critical systems. It is also a good choice for developers who want to learn a modern language with a focus on safety.
9. PHP
PHP is a server-side scripting language that is used for developing web applications. It is a popular choice for developing WordPress and Drupal websites.

10.Ruby
Ruby is a general-purpose programming language that is known for its simplicity and expressiveness. It is used for a wide variety of tasks, including web development, data science, and machine learning.

These are just a few of the many programming languages that are popular in 2024. When choosing a programming language to learn, it is important to consider your interests and goals. If you are interested in web development, you may want to learn JavaScript, Python, or PHP. If you are interested in data science or machine learning, you may want to learn Python, R, or Julia. And if you are interested in systems programming or embedded systems development, you may want to learn C, C++, or Rust.
No matter which programming language you choose to learn, there are many resources available to help you get started. There are online tutorials, books, and courses that can teach you the basics of programming. And once you have a basic understanding of programming, you can start building your own projects to practice your skills.
Conclusion
The tech industry is constantly evolving, and new programming languages are emerging all the time. However, the programming languages listed in this blog post are all popular and in-demand in 2024. If you are looking to learn a new programming language in 2024, any of the languages on this list would be a great choice.
Read MoreDeleting 9gag comments easily
It is a very tough job to delete 9gag comments from a very active thread as your comment will be hidden somewhere amongst thousands of comments. But I will share with you an easy way to do it. Using this method you will be able to go to your comments directly one by one and delete them no need to search for needles in a haystack. Let us dive into the process step by step.
Request your data from 9gag
The first step is to request your data from 9gag. You can do this by going to Profile->setting->privacy and safety. See the image below

Once you click on privacy and safety you will get an option to request data

Once you click on the Request my data button, 9gag will send you all your data in an HTML file after some time maybe one or two days.
Deleting 9gag comments
Once you get your 9gag data in an HTML file in your registered email then you need to extract it and open it in a browser. It will be something like this

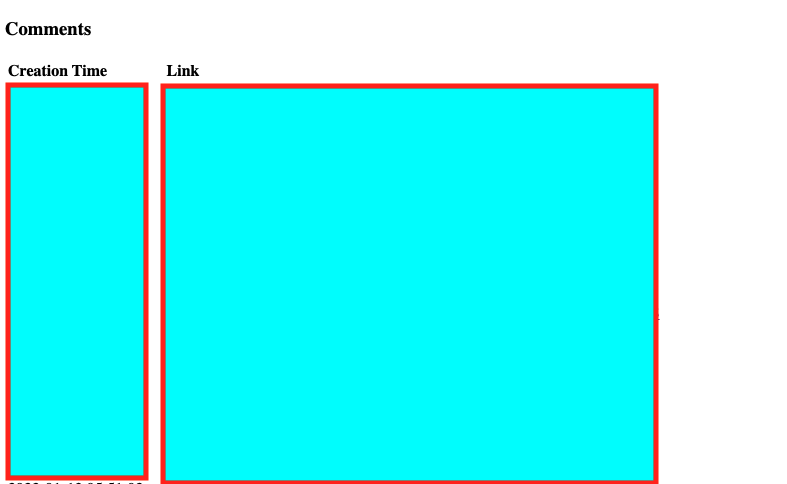
Now, this HTML file has all your 9gag data. To delete your 9gag comments scroll down till you reach the comments section. The comment section will have the time of the comment and a URL directly linking to your comment, yes directly linking to comment no more searching. See the image below

The left block consists of a time of creation and right block will have direct links to comment. Now from here, we need to go one by one through each link open it in 9gag just by clicking and deleting the comment if you wish. As of now, it is a manual process from here on if any of you fellow 9gagers come across automation do let me know in the comments. Hope it helps
Read MoreSwift Tutorial | Simple UITableView with RxSwift and RxCocoa
RxSwift is awesome we know it and most of us have experienced it. We also know that it is very easy to learn but requires a different thought process making it a bit tough to wrap your head around it. In this post, we will be making a simple UITableView implementation using RxSwift and RxCocoa. No complex patterns to confuse you, the idea is to understand one thing at a time. If you are looking for without Rx implementation you can have a look here..
Getting started
- Create a project you can name it as per your choice select Storyboard
- Close xcode project
- Open terminal and cd <your project folder>
- Run pod init
- Run pod install
- Open your project from workspace file. Pod install will create a workspace file for you its almost always below your pbxproject file
- In the project you will see Pods folder expand it and open pod file it will look some thing like this

- Add pods for RxSwift and RxCocoa
- pod 'RxSwift', '~> 5'
- pod 'RxCocoa', '~> 5'
- Close the project again and run pod install in terminal
Setting up your UITableView
- Drop a
UITableViewin ViewController Scene of your stroy borad and set constraints 0,0,0,0 - Add a
UITableViewCellin the table view and set its Identifier as "Cell" - Create a
@IBOutlet weak var tableView:UITableView!and link your table view
Setting up your view controller
Start by importing RxSwift and RxCocoa in your view controller.
import RxCocoa
import RxSwift
Create a dispose bag and data source
    var fruitDic: BehaviorRelay<[[String : String]]> =
          BehaviorRelay(value:
              [["name":"apple"],
               ["name":"banana"],
               ["name":"cherries"],
               ["name":"grapes"],
               ["name":"lemon"],
               ["name":"orange"],
               ["name":"strawberry"],
               ["name":"tomato"]])

      var disposeBag = DisposeBag()
In order to create our data source, we have used behaviour relay. It stores values that cannot be mutated. In order to change the data stored in a BehaviourRelay we must first extract it and update it after that we can put it back in BehaviourRelay. BehaviourRelay emits the latest data it has to all its subscribers. We need to subscribe to our data source but before that, we will setup tableview delegate
      func inputTableView() {

          // Set tableview delegate.
        tableView.rx
              .setDelegate(self)
              .disposed(by: disposeBag)

          // Bind fruit dictionary and tableview
          fruitDic.asObservable()
              .bind(to: tableView.rx
                        .items(cellIdentifier: "Cell", cellType: UITableViewCell.self))
              { index, element, cell in
                  // Write image, name for cell label.
                cell.textLabel?.text = element["name"]
          }.disposed(by: disposeBag)

        tableView.tableFooterView = UIView()
    }
Now call this function inputTableView() from your viewDidLoad and add the table view delegate method for row height. After this, you can run your project in the simulator to see the table view working. I have also added item selected subscription and the final Viewcontroller class looks like this.
 //
//  ViewController.swift
//  RxSwiftUItableview
//
//  Created by amarendra on 10/09/21.
//

import UIKit
import RxCocoa
import RxSwift

class ViewController: UIViewController, UITableViewDelegate {

    @IBOutlet weak var tableView:UITableView!
    var fruitDic: BehaviorRelay<[[String : String]]> =
          BehaviorRelay(value:
              [["name":"apple"],
               ["name":"banana"],
               ["name":"cherries"],
               ["name":"grapes"],
               ["name":"lemon"],
               ["name":"orange"],
               ["name":"strawberry"],
               ["name":"tomato"]])

      var disposeBag = DisposeBag()

      override func viewDidLoad() {
          super.viewDidLoad()
          inputTableView()
      }


      func inputTableView() {

          // Set tableview delegate.
        tableView.rx
              .setDelegate(self)
              .disposed(by: disposeBag)

          // Bind fruit dictionary and tableview
          fruitDic.asObservable()
              .bind(to: tableView.rx
                        .items(cellIdentifier: "Cell", cellType: UITableViewCell.self))
              { index, element, cell in
                  // Write image, name for cell label.
                cell.textLabel?.text = element["name"]
          }.disposed(by: disposeBag)
        // added did select equivalent and printed corresponding name
        tableView.rx.itemSelected.subscribe { [weak self] (indexPath) in
            print(self!.fruitDic.value[indexPath.row]["name"]!)
        }.disposed(by: disposeBag)

        tableView.tableFooterView = UIView()
      }


      func tableView(_ tableView: UITableView, heightForRowAt indexPath: IndexPath) -> CGFloat {
          return 40
      }

}
Read More